Tower Control's known for being the most snowbally mode in the game, and for good reason. The special advantage is infamous for making defense feel pretty awful: you got to take care of the entire enemy team while dealing with strikes, zookas, bubblers, krakens, you name it. Not to mention eliters, I LOVE eliters on TC.
"So how could you possibly retake?? I'm a convenient B rank player who can't rank u-", I hear you asking. Well good thing I'm here, as a world renowned professional splatoon 3 expert, I will teach you how to defend as a frontline.
Just to be clear, I'll be refering to the team on tower as the attackers, and the team that needs to stop the tower as the defenders. And this guide applies solely to aggro frontlines players, I don't want to see any explo players attempting this.
This was something I struggled with a LOT before, I'd either run straight in and inevitably trade, unless I literally diffed the entire enemy team, or sit back, throw bombs, and ultimately achieve nothing... until I played Lemuria Hub TC.
This map is widely considered bad, according to most people, mostly for the wall it adds to cut off some routes. I wish I could show the map, but sendou.ink's map planner unfortunately doesn't have it yet, so I'll try to explain it. This wall is mostly there to prevent attackers from blocking the flank that goes through the conveyor on top mid, that you can access by dropping on the right of your spawn. That makes this flank infinitely better, the attackers need to go through a long, 10 points long checkpoint (if I remember this right), while the defenders have access to high ground that lets them directly shoot the tower.
Once I figured it out, it made playing Tower Control feel much, much better, the mode never felt great to me but once I learned this, it made grinding it in X so much easier. Let me go straight to the point:
Flank the tower.
On Lemuria Hub for example, even if you fail to kill the tower rider, you still most likely required at least one opposing frontline to turn back and look at an irrelevant spot, you distracted them from the objective line.
If you don't know what an objective line is, think of it as the path the attackers are forced to take to move forward and score points, like a rainmaker route, or more simply, the tower path.
If you can distract the enemy team from moving forward, that at least helped your team stabilize and gain some map control back while the enemy team was busy dealing with you. That's why it's important to recognize what kind of fight you're in.
This is general game advice but if you can tell that you're in a 1v3 or a disadvantageous fight, stall, you won't win this. If you can keep the enemy team busy looking at an irrelevant spot to the objective line, that's good value, the more time you waste, the more your allies will be able to spot the opening you created, it's even better if you can jump out.
Though that's only if you can't get to the tower, which in my experience, is not that difficult to pull off in most solo queue environments. If you can kill the tower rider and not get traded out, you've just disrupted the entire enemy team, not to mention the tower rider is usually a very valuable player to take out, a tacticooler user or a backline. Not to mention that's usually where they'll give jumps back in, so you even prevent enemies from jumping in.
An important piece of advice I can give though is to remain discreet. If you can, make your paint trail as small as possible, and avoid throwing bombs until you've been discovered, if you can stick to low ground and stay behind cover, that's great too.
________________________________________
I've rambled quite a bit, so let me show some examples. I put you as the tetra dualies, since that's kind of the standard Quick Respawn frontline, which this guide especially applies to, though it applies to most frontlines really. And the other weapons are your standard X rank TC comp, showing the enemies.
Let's start with Sturgeon Shipyard:

This one's pretty simple to understand, once a team gets to first checkpoint, they'll usually stack on your left snipe (I don't know map callouts, don't judge me), or your main snipe (I'm trying), they don't want to look at mid, which leaves you a wide opening with even some high ground to make use of. You can even go through your spawn's high ground all the way until the drop bottom right, if they've already taken your court or snipe.
This flank works for quite a while too, even if they're at the second checkpoint, it still works, and if there's someone still in mid, you can go behind it, be creative.
Mako Mart!

This one shows that you need to keep track of where it's safe to drop. Prioritize fast routes, bottom right is ideal here, but if the range blaster is already looking at it, go all the way to the left. They might get first check, but you can use the stacks to target the tower afterwards.
A notoriously snowbally stage: Flounder Heights

This might just be the most valuable flank, since defending on this stage is very difficult. You can get creative with it too, there's a lot of variations, you can use your snipe with the ink rail, go in the tunnel...
And Hammerhead Bridge:

I wanted to show that this strategy works on the 'bad' stages too. This flank is a lot harder since you don't have much terrain to work with and the tower will move to your plat pretty fast, but it's doable.
(Also this is pre rework hammerhead. Can you spot a difference?... me neither)
________________________________________
Sharking! That's right, there's MORE! (I'm almost done)
It's also valuable to shark the tower. It's going to move predictably so if the entire enemy team is around the tower, wait a little bit before showing up, just to make sure you won't get immediately traded. Don't forget the important part is making sure the enemies don't get the checkpoints, you can let them score a few points.
This is also great in overtime, find a spot on the side of the objective line, wait for the enemies to all rush forward, and get on tower after slaying the rider.
Specials!
Specials are extremely valuable on retake on TC, since you don't get any special charge on defense, so keep an eye on your special gauge. I play Recycled Mk II on TC, and let me tell you, popping a splashdown on retake can be immensely valuable.
To conclude, Tower Control gets much easier once you learn to exploit the full map, don't just stick to the objective line, use the sides! I only used 4 examples here, but I promise you there's a lot of routes to make use of in every stage.
Once you put this in practice, you can get triple kills, even quads, and overall guarantee your team's retake, which feels amazing to pull off. A lot of players don't expect these flanks, so, why don't you show them a surprise?
"So how could you possibly retake?? I'm a convenient B rank player who can't rank u-", I hear you asking. Well good thing I'm here, as a world renowned professional splatoon 3 expert, I will teach you how to defend as a frontline.
Just to be clear, I'll be refering to the team on tower as the attackers, and the team that needs to stop the tower as the defenders. And this guide applies solely to aggro frontlines players, I don't want to see any explo players attempting this.
This was something I struggled with a LOT before, I'd either run straight in and inevitably trade, unless I literally diffed the entire enemy team, or sit back, throw bombs, and ultimately achieve nothing... until I played Lemuria Hub TC.
This map is widely considered bad, according to most people, mostly for the wall it adds to cut off some routes. I wish I could show the map, but sendou.ink's map planner unfortunately doesn't have it yet, so I'll try to explain it. This wall is mostly there to prevent attackers from blocking the flank that goes through the conveyor on top mid, that you can access by dropping on the right of your spawn. That makes this flank infinitely better, the attackers need to go through a long, 10 points long checkpoint (if I remember this right), while the defenders have access to high ground that lets them directly shoot the tower.
Once I figured it out, it made playing Tower Control feel much, much better, the mode never felt great to me but once I learned this, it made grinding it in X so much easier. Let me go straight to the point:
Flank the tower.
On Lemuria Hub for example, even if you fail to kill the tower rider, you still most likely required at least one opposing frontline to turn back and look at an irrelevant spot, you distracted them from the objective line.
If you don't know what an objective line is, think of it as the path the attackers are forced to take to move forward and score points, like a rainmaker route, or more simply, the tower path.
If you can distract the enemy team from moving forward, that at least helped your team stabilize and gain some map control back while the enemy team was busy dealing with you. That's why it's important to recognize what kind of fight you're in.
This is general game advice but if you can tell that you're in a 1v3 or a disadvantageous fight, stall, you won't win this. If you can keep the enemy team busy looking at an irrelevant spot to the objective line, that's good value, the more time you waste, the more your allies will be able to spot the opening you created, it's even better if you can jump out.
Though that's only if you can't get to the tower, which in my experience, is not that difficult to pull off in most solo queue environments. If you can kill the tower rider and not get traded out, you've just disrupted the entire enemy team, not to mention the tower rider is usually a very valuable player to take out, a tacticooler user or a backline. Not to mention that's usually where they'll give jumps back in, so you even prevent enemies from jumping in.
An important piece of advice I can give though is to remain discreet. If you can, make your paint trail as small as possible, and avoid throwing bombs until you've been discovered, if you can stick to low ground and stay behind cover, that's great too.
________________________________________
I've rambled quite a bit, so let me show some examples. I put you as the tetra dualies, since that's kind of the standard Quick Respawn frontline, which this guide especially applies to, though it applies to most frontlines really. And the other weapons are your standard X rank TC comp, showing the enemies.
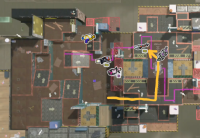
Let's start with Sturgeon Shipyard:
This one's pretty simple to understand, once a team gets to first checkpoint, they'll usually stack on your left snipe (I don't know map callouts, don't judge me), or your main snipe (I'm trying), they don't want to look at mid, which leaves you a wide opening with even some high ground to make use of. You can even go through your spawn's high ground all the way until the drop bottom right, if they've already taken your court or snipe.
This flank works for quite a while too, even if they're at the second checkpoint, it still works, and if there's someone still in mid, you can go behind it, be creative.
Mako Mart!
This one shows that you need to keep track of where it's safe to drop. Prioritize fast routes, bottom right is ideal here, but if the range blaster is already looking at it, go all the way to the left. They might get first check, but you can use the stacks to target the tower afterwards.
A notoriously snowbally stage: Flounder Heights
This might just be the most valuable flank, since defending on this stage is very difficult. You can get creative with it too, there's a lot of variations, you can use your snipe with the ink rail, go in the tunnel...
And Hammerhead Bridge:
I wanted to show that this strategy works on the 'bad' stages too. This flank is a lot harder since you don't have much terrain to work with and the tower will move to your plat pretty fast, but it's doable.
(Also this is pre rework hammerhead. Can you spot a difference?... me neither)
________________________________________
Sharking! That's right, there's MORE! (I'm almost done)
It's also valuable to shark the tower. It's going to move predictably so if the entire enemy team is around the tower, wait a little bit before showing up, just to make sure you won't get immediately traded. Don't forget the important part is making sure the enemies don't get the checkpoints, you can let them score a few points.
This is also great in overtime, find a spot on the side of the objective line, wait for the enemies to all rush forward, and get on tower after slaying the rider.
Specials!
Specials are extremely valuable on retake on TC, since you don't get any special charge on defense, so keep an eye on your special gauge. I play Recycled Mk II on TC, and let me tell you, popping a splashdown on retake can be immensely valuable.
To conclude, Tower Control gets much easier once you learn to exploit the full map, don't just stick to the objective line, use the sides! I only used 4 examples here, but I promise you there's a lot of routes to make use of in every stage.
Once you put this in practice, you can get triple kills, even quads, and overall guarantee your team's retake, which feels amazing to pull off. A lot of players don't expect these flanks, so, why don't you show them a surprise?