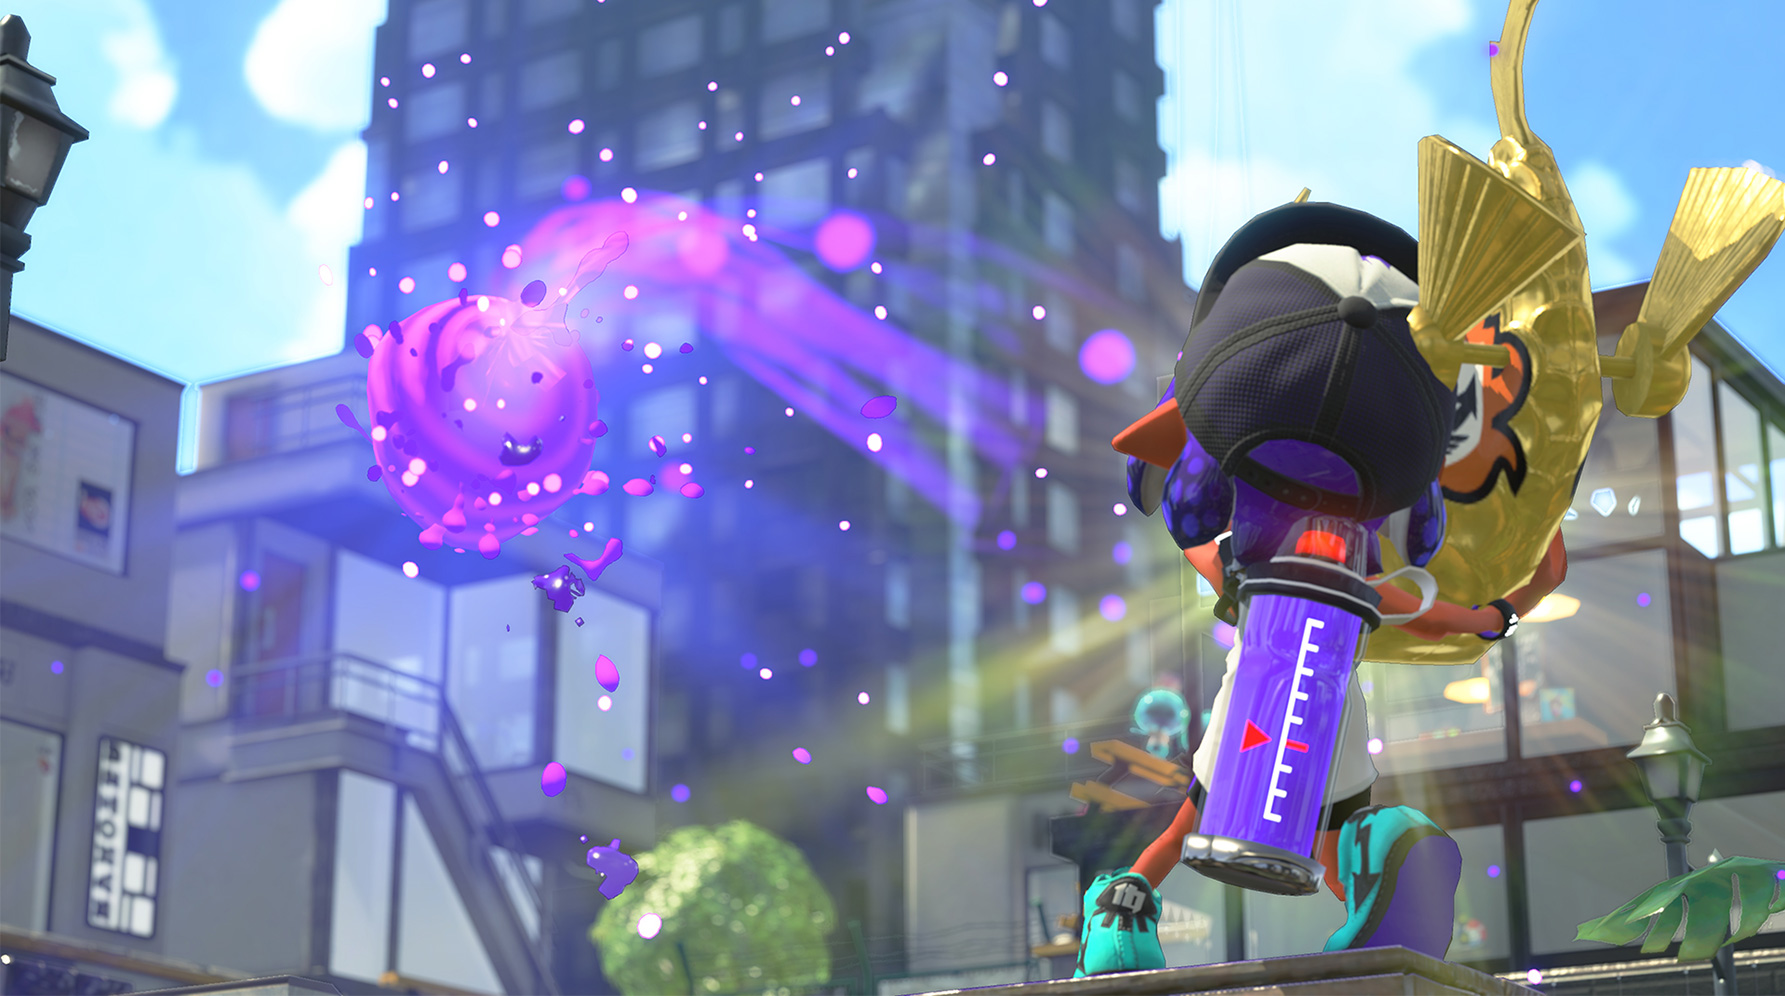
The ultimate objective of Rainmaker is to assume control of the Rainmaker itself, a large, golden, dragon head capable of shooting enormous bursts of exploding ink, and carry it to a designated spot near the enemy spawn point. What makes this mode so challenging? There are several complications.
Before explicating the mode in depth, let us take an introductory glance at the beginning of a Rainmaker match, basic rules, and the objective.
Table of Contents
Section 1:
- Objective
- Rules
- Start of Match
- Team Compositions/Roles
- Strategies
- Mid-Match
- Overtime
- Refining Your Rainmaker Play
- End of Match
Subsection 1 - Objective
The simplified objective of Rainmaker is this: carry the Rainmaker from its origin (the center of the stage) to the pedestal nearest your opponent's base. You have a pedestal as well; a good rule of thumb is to locate both your opponent's goal and your own before attempting to play a stage. Each stage has its own goal location and its own Rainmaker origin.
As you grow in your Rainmaker experience and skill, this knowledge will enhance your gameplay as you become more confident in new techniques and routes, both offensively and defensively.
For further clarification, the Rainmaker pedestal quite resembles a conical stump with its top partially sliced off. The sides are able to be inked, and this is one of two ways to access the top (the ultimate goal). The other way constitutes jumping off a vantage point at an equal or higher elevation to the stump's top. Either way will result in victory.
Subsection 2 - Rules
The following are explicit rules that exist within the Rainmaker mode, not implied rules within strategies that will be discussed later.
1. Picking Up the Rainmaker
To pick up the Rainmaker, you must first pop the shield surrounding it. Whenever the Rainmaker resets, and at the start of a match, a shield similar to Zapfish shields (from Octo Canyon and Octo Valley) immediately forms around it. This shield can only be penetrated with ink; eventually, when enough ink is shot at it, the shield will explode, covering nearby surfaces with the color of the ink that caused it to open, splatting nearby opponents, and leaving the Rainmaker exposed. Simply swim or walk into it to pick it up. Either team can do so once the shield has been popped.
2. Holding the Rainmaker
Holding the Rainmaker is no easy task. You both walk and swim slower, cannot Super Jump, use your main weapon, sub weapon, special weapon, and cannot lose the Rainmaker without being splatted. On the map, the ranked symbol indicates the Rainmaker's position and is displayed to both teams.
3. Using the Rainmaker
The Rainmaker works similarly to a charger or Splatling, in that it charges its shots. The shots themselves, however, differ drastically. Instead of a single line of ink, the Rainmaker shoots a massive ball of ink that explodes soon after touching a surface. When a shot is charging, a white glow emanates from the Rainmaker's mouth, progressively getting brighter until fully charged. Releasing the ZR button will unleash the shot. Similar to the aiming feature included when holding down R (the bomb button), holding down ZR when holding the Rainmaker allows the user to direct its shots with a line displaying the shot's trajectory. Also, while a shot is charged, the Rainmaker moves even slower than usual.
4. Losing the Rainmaker
As mentioned previously, the only way to lose the Rainmaker is to die. If an enemy splats you, the Rainmaker will remain in the last position you held while alive and on ground. After a few moments, the shield reforms and must be popped by either team to obtain the Rainmaker. If no member of either team picks up the Rainmaker within about 15 seconds, it will reset and return to its origin on the map with the shield intact, regardless of whether it was broken before, and cannot be reset from this position. If the holder of the Rainmaker falls of an edge of a map, the Rainmaker will similarly reset.
5. The Timer
Once the Rainmaker is obtained, a timer appears above it. If the holder of the Rainmaker has not died within that 60 seconds, the Rainmaker will explode, causing an ink explosion in the opposite color of the holder, and splat any teammates in the area.
6. Goal Distance
If the Rainmaker reaches its goal, the game ends with a KO. However, not every game is a KO. The way the winner is determined uses a feature called goal distance. On the top of the screen, at the beginning of the match, a line appears that represents the distance between the two goals The Rainmaker, starting in the middle of the map, is at distance 100, equal to both. When a team grabs the Rainmaker, and progresses forward towards its goal, the Rainmaker's position will decrease until the team loses the Rainmaker or scores a KO. Whichever team achieves the lowest goal distance will win in the event of a lack of a KO.
Subsection 3 - Start of Match
At the start of a Rainmaker match, as previously stated, the Rainmaker will form at the exact center, surrounded by its shield. Usually, the first play for both teams will be to attempt to pop the Rainmaker shield first, for two good reasons:
1. Gaining Map Control - since the popping of the Rainmaker shield produces a wide spread and explosion of the team's ink, this is an excellent way to gain prominent center map control quickly at the beginning of a game.
2. Easy Rainmaker Access - again, since map control is in the favor of one team, the other team will have a harder time grabbing the Rainmaker, allowing the team who popped it to gain an advantage.
Remember: grabbing the Rainmaker immediately is not often the smartest play. Even though the team who popped it most likely has acquired mid control, the opposers are still likely to be nearby, rendering any hurried approaches futile. Instead, try pushing the enemy team back, grab the Rainmaker, and then push, with the Rainmaker more secure.
If the enemy team has the Rainmaker, attempt to hold your position and splat any rogue strays making solo pushes, hoping their team will follow suit. Backliners are especially beneficial if this occurs, and this can enable slayers and supporters to regain mid control and even launch their own initial push.
Section 2
Subsection 1 - Team Composition/Roles
Rainmaker is an interesting mode for which to contemplate team compositions, because one weapon is always decided. Depending on the aggressiveness/passivity of the team, the Rainmaker itself can function as backline, midline, or even frontline.
That being said, let us first theorize potential team compositions. Arguably, one of the best balanced comps would be this:
Backline, Support (designated Rainmaker carrier), Support, Slayer
This enables the Rainmaker to function as a midliner, protected from the front by a slayer and a support, who also can push, with any flanks being detected and destroyed by the backliner behind the Rainmaker. Another team comp, slightly less balanced, could be this:
Backline (designated Rainmaker carrier), Support, Slayer, Slayer
This comp places the Rainmaker in the rear of the party, and while it less susceptible from the front (as the two slayers can, between the two of them, drive back most defenses), it leaves only one support near the Rainmaker. Supportive weapons rarely are beneficial in the back, as they have less range, so this leaves the Rainmaker alone and somewhat ill-equipped to deal with potential flanks.
If readers have any other suggestions for team compositions, please let me know!
In normal ranked battles, it is less than likely that you will receive a balanced team composition, regardless of your preference. Always be sure to adapt to your comp, and sometimes you may have to fill two different positions!
Subsection 2 - Strategies
General strategies -
For slayers: your main focus should not be the objective. Of course, should the Rainmaker require your assistance, absolutely help it, but when a push's momentum is strong, keep your eye on the enemy team and splat as many as possible. Always keep an eye on the gauge indicating the Rainmaker's progress and the map - this will allow you to more effectively decide how far to push. Sneaking or sharking can assist your team as well, but in small quantities, as you want most of the enemy fire directed at you and not the supporters or the Rainmaker. Don't be afraid to sacrifice yourself if you are fairly confident it will result in your team's taking the lead or decreasing goal distance.
For supporters - find the middle ground between the Rainmaker/backliner(s) and the slayer(s). Keep one eye on the Rainmaker and the other on enemies that slip past the slayers' offenses. At the same time, gain map control by painting in front and behind the Rainmaker itself so that surprise flanks or ambushes are less likely. If the Rainmaker cannot get past a certain choke point, be sure to assist it as much as possible and, like slayers, keep enemy fire concentrated on you, not the Rainmaker.
For backliners - drive back flanks and attack any players managing to break through both the slayers and the supporters. You should try not to become a focal point for enemies in battle; if the Rainmaker gets splatted, your teammates will need someone to jump to. Picking off stragglers and even assisting the supporters and slayers from the back is crucial to a push's success.
For the Rainmaker - stay anywhere but the very front or the very back of your team. Those are the two most dangerous places. Spam your powerful charged shots in areas where potential enemies could lie, or even just to deter and detain enemy movement. If stalled, continue firing until your teammates open up a way forward. Never solo push unless absolutely necessary, and if most of the opponents are focused on your team. Finally, listen to your teammates when they say "This Way!" It is likely that they are saying that for a reason.
What do I do when...
I'm the only one alive? Firstly, try to stay that way and don't engage in reckless behavior unless it stems from desperation or if you are absolutely sure it will be significant (see next sentence). Secondly, if you're not a backliner, camping and splatting the Rainmaker in spite of potential death can stall the enemies and give your team precious time to return to the battle. If you are a backliner, retreating and finding a good vantage point can be beneficial for jumpers, or, depending on the severity of the situation, you can also jump back to your spawn point to regroup with your team.
The opponents are on the offensive? The truth comes from the old saying, "the best defense is a good offense." If you attempt to hold your position, the opponents can usually undermine/flank you and still make progress (however inconsequential). Instead, try swarming the weak spot in the offense's chain, and attack from there. A successful splatting of the Rainmaker generally leads to a successful defense, as the opponents must return to that spot if they want to grab it and continue the push. Camping and ambushing is effective as well.
The opponents are on the defensive? Be wary of ambushes! Move stealthily but quickly, as camping is rarely beneficial for offensive purposes. Keep watch over the Rainmaker, and push within reasonableness.
The opponents are near the goal, and the Rainmaker's shield is down? Especially if you have less team members alive than your enemies, jump off the map with the Rainmaker to reset it. This forces the enemies (or at least some of them) to return to the center of the map, allowing the rest of your team to gain an advantage over the remaining opponents in your base.
Subsection 3 - Mid-Match
By now, both teams have usually made relatively minor pushes (perhaps only gaining 30 or so points). The time for one team to make a major push has come, and it normally starts by a team wipe (or an effective wipe). Once that occurs, the team responsible can make much more progress than previously.
In this stage of the game, tactics should begin evolving into or coinciding with overall strategy. Your position and movements should be more intensely focused on pushing in a grand way. While KOs rarely occur in this stage, the events leading up to them do.
Section 3
Subsection 1 - Overtime
Overtime begins under the two following conditions:
If the winning team (i.e. the team with the lowest goal distance) has lost the Rainmaker within the last fifteen seconds of the game.
If the losing team is in possession of the Rainmaker.
Stemming off these two conditions, overtime will end:
If the losing team loses the Rainmaker before obtaining the lead.
If the losing team obtains the lead.
If the winning team obtains the Rainmaker.
Subsection 2 - Refining Your Rainmaker Play
How can you improve your Rainmaker play? Here are a couple of suggestions.
There are numerous strategies and theories listed in this guide, but not all of them work for every situation. By experiencing the mode and practicing it for yourself, you can more easily adapt to more scenarios and even come up with your own strategies. Both of these are integral to becoming better at Rainmaker.
Go into recon mode and test out potential Rainmaker routes. This lets you freely experiment with new ideas that could serve you well online on a stress- and time-limit-free basis.
Find out whether you prefer being the Rainmaker carrier or not. When Rainmaker was first released on Splatoon, everyone wanted to be the Rainmaker carrier, and you often competed more against your own teammates than against the opponents. Now, more players have decided for themselves which role they would prefer to fulfill, and doing this for yourself will make every game you play go that much smoother.
Subsection 3 - End of Match
The match is almost at a close. Your team (or the opponent's team) has gotten close to scoring a KO. The only thing required in this stage? Constant oppression. Relieving pressure could enable them to make a comeback.
On the other hand, if you are the losing team, the same thing is required. Desperate times call for desperate measures, but make sure there is organization in your chaos.
I will provide slight updates for this guide in the future if I realize I missed something, but for now, thanks for reading! Any comments or advice are welcome.
